The World Tree/Prologue/Scene Levels
Overview
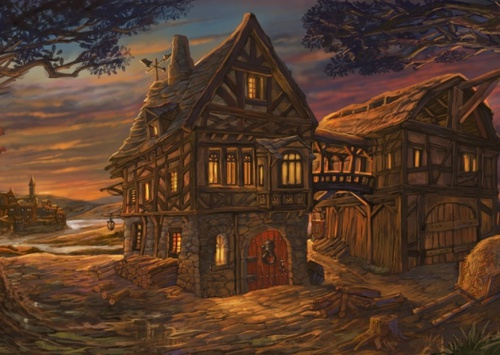
The prologue was designed to get players engaged in the action and develop a "hooked" party for the campaign The World Tree. Characters are asked to make their backstories begin at The Salty Dog tavern in Valea, a sea port town, and at least one of the characters having a connection to an old elf named Orland Earcoro. While there, the players are gathered and informed of their summons by the Thal Council and are asked to leave immediately. When doing so, a drunk patron named Glorik Mastbreaker claims the party didn't pay for their drinks, creating an early game scene with little to no cost of life or impact on story hooks. While traveling, the group is halted by "Thal Toll Collections Agency", which are actually members of a secret cult disguised as Toll Collectors (Werewolves 1st playthrough). If the clues are pieced together, they will be revealed as the Scarlet Eye, a mercenary group that have sought out the players specifically. This is not required for experienced or social groups and does not affect further story if prologue is not completed.
This encounter can take place one of five places, each with their own unique advantages and disadvantages.
The Tavern
This is where combat is most likely to take place, where the initial meeting with Glorik takes place. This room as a lot of difficult terrain creating elements, such as knocking over a table or chair. Be sure you have tokens or markers to show where these take place, should a creature do so. There is also a dual sided fireplace in the center, facing north and south and a bar that runs along the center of the west wall. A stairwell and storage room are also on this floor, although it is not very likely that they will be used should combat take place here.
As far as other NPCs, there is the tavern owner and other sailors and traders who have decided to stay, roughly filling 3/4 of its total capacity. They will avoid danger and should only be considered if their immediate harm is imminent, causing any NPC that exits to contact the law.
The Rooms
The rooms are located using the stairwell from the tavern area. The players rooms are located at 1 and possibly 2, should the party exceed four beds. Other occupants include a local noble and family of the barkeep, but are away at this time. Within their rooms, there is only their personal belongings. Should a player be seen within these rooms, an NPC will alert the authorities immediately. A door leads to a bridge connecting the two buildings at the southern east wall. This is a restricted area and any employee of The Salty Dog will alert the authorities.
Combat here remains largely open. Enemies will avoid going close to the rooms and stay within the main area.
The Barn
The barn is the ground floor of the building next to The Salty Dog. The ground floor is abandoned and is largely in a state of disarray. This is the location of the former Salty Dog, and has long since been rebuilt. A curtain divides the barn, with the northern room holding a table and chairs, a fireplace, and a stairwell leading to the gambling area, and the southern room holding an abandoned kitchen and preparation area. A porch is located on the western side of the building and is dangerous to trespass over. Making a mental note of where rotting boards are can add to this combat environment.
Combat here is open, with advantages being for long ranged players. Floorboards may break under creatures feet (DC 10 Dexterity saving throw) and the rotten furniture can be toppled over to make difficult terrain. The curtain provides total cover, but a creature can pass through it as if it were difficult terrain.
The Gambling Attic
The gambling attic is located on the second floor of the barn, where rich merchants, traders, and sailors gather to gamble. Gambling is illegal in Valea, but this provides a safe haven for them, due to the barkeep keeping a blinded eye to the area. Two circle tables of equal side are located to the north and the south of the larger circle table due to a large mass of sailors wanting to gamble. Floorboards are unsteady in the southern area and could cause a player to fall through the floor into the barn below. There is also a door within this room that leads to the rooms of The Salty Dog.
The majority of this combat is blocked by tables, chairs, and broken floorboards, making this a difficult area to fight in. It is important to make mental notes of where loose floorboards are and have tokens at the ready for the holes and furniture that creates difficult terrain.
Outside
And of course, combat can also take place outside. A well is located to the north of the barn and horses are ties to the western hitching post of The Salty Dog.
This encounter provides a lot of cover between buildings and behind the well and potential horses. Have tokens ready for horses and possible guards, should an NPC escape to the south.
Scene II
Tactics:
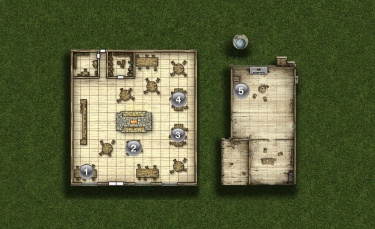
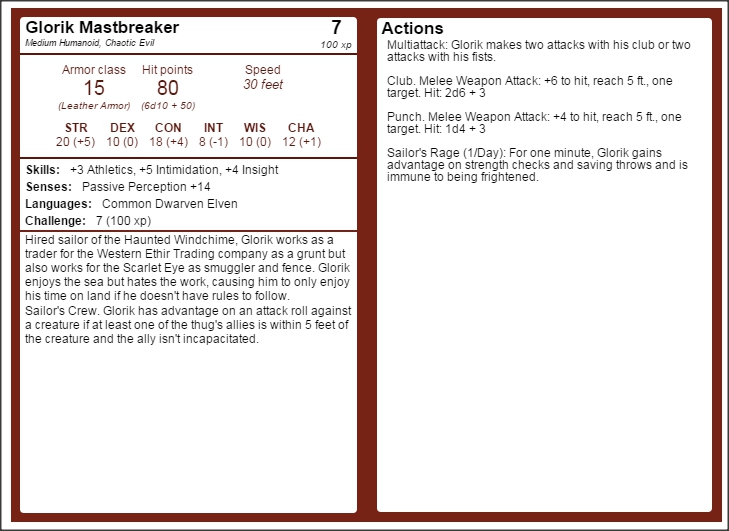
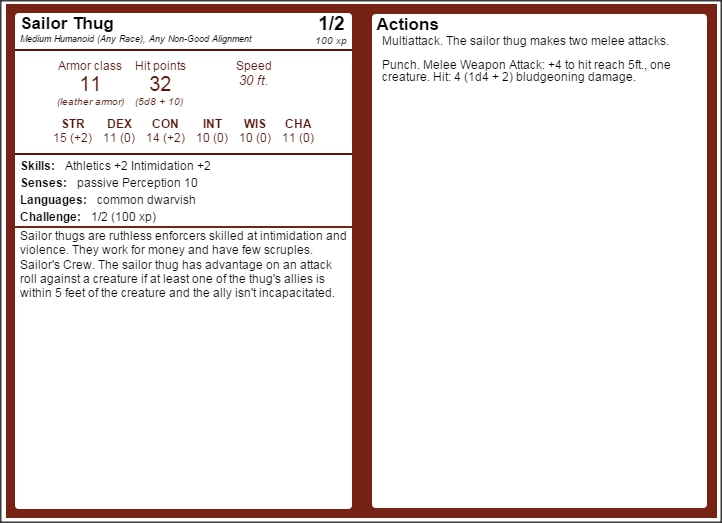
Once combat has begun, Glorik will attack ferociously, using his first turn to break a leg off of a chair using Sailor's Rage. He will then use this makeshift club (simple club) on the nearest target. Glorik’s friends will attack a party member that is not engaged using their fists against them. Should a player draw a weapon against an unarmed sailor, they will disengage and flee to find the law.
Features of the Area:
- Player starting point. The party will be seated at the table except for the chair closest to the door.
- Glorik's starting position. Glorik may have one or two close friends sitting with him.
- Glorik's gang starting position. Glorik's friends will be seated at point 3 and 4, depending on party number.
- See 3.
- Reinforcements. Should the party allow more than one sailor to escape if a weapon is drawn, one will sprint to the port (by exiting south off of the map) and another will summon more sailors from upstairs.
Illumination: Bright light
Terrain features: Any overturned furniture will become difficult terrain. To pass over a five foot area that is difficult terrain (such as a chair or stool), creatures must make a DC 10 Athletics or Acrobatics check. To knock over a fleeing sailor will require a DC 20 Athletics check to push them 10 feet prone.
Treasure: Glorik is carrying 20 gp and possesses a long sword. Between them, Glorik’s gang members are carrying 60 gp.
Statblocks
-
Glorik Mastbreaker Statblock
-
Sailor Thug Statblock
Scene 1 Conclusion:
When the scene is concluding, it is revealed Glorik has a tattoo of a large eye on his shoulder and if he is able to speak and conscience, will attempt to find out as much information as possible.
Scene III (150 xp)
Leaving Valea:
This scene is broken into two different scenarios. The first scenario is if the adventurers go to The Thal on their own terms. The second scenario is if the adventurers refuse, choose to escape, or caused the law to arrive at The Salty Dog.
The Toll Collectors of Thal
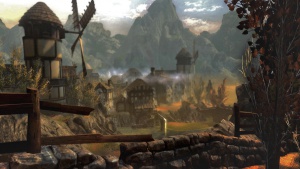
When the players are ready to continue, describe the following regardless of whether horses or by foot is taken.
The trip from Valea to Thal is a short one, only taking a day's journey to arrive. As you pass through the countryside, the coastal weeds and unkempt grass become shorter and less tangled. Trees begin to grow sporadically until the form small groves and meadows. The ocean smell is left behind as you insects begin to buzz around you if you pause even for a moment. The air his thick with humidity as the sounds of songbirds and other wildlife become more abundantly clear.
The bell tower and town hall can be seen over the trees amassing in the distance, it would seem as if though you will be able to reach arrive in no time. The stench coming from your armor and dust collecting on your boots tell you the rest will be well appreciated.
Setup:
What happens next is up to the players. As the DM narrates the following sequence, players may insist on a check to hide. Two men are walking down the road. This will require a DC 17 Stealth Check, due to the two figures watching the party traveling. Keep whether the rolls were a success or failure a secret and continue with the encounter.
If the entire party hides successfully, the two will continue one, awarding experience equivalent for the two of them. If anyone in the party fails, the two men will stage a conversation about whether one remembered the money for the toll ahead. They will then be attacked with surprise as other members of the Scarlet Eye sneak up on those who failed.
If the party chooses to confront the two men with words, the following will take place:
Upon the path in the distance, two men are approaching you from the road, seeming as if though they are traveling to Valea. As you approach one another, they call out to you.
"Hold traveler! The toll for this road is 10 gold pieces. You'll have to turn back if you can't pay it."
Then it is up to the players to pay or not to pay. The two can not be persuaded to ignore the toll and if questioned about the reason, will respond with threats and violence, possibly charging more for things such as horses, races, weapon possession, etc. If the party pays and continues, no experience is given. Choosing to fight will invoke an encounter.
If the party failed a stealth check or refuse to pay, begin the encounter. Refer to Prologue Scene Levels for the battle map of this area.
Tactics:
The two collectors will use a whistle to alert those who are hiding to come out of hiding (DC 25 to spot). They will then draw their weapons, attacking the party as a distraction. The remaining attackers (See Prologue Scene Levels) will fire from their hiding spots and surround the players (1st playthrough lycanthrope clan). These enemies would rather die than be captured, hoping to contain their purpose, but will flee if they are over run. If captured, they will drink a poison to kill themselves, hiding the information.
Features of the Area:
Illumination: Bright on the road, dim if within the shadows of the trees.
Terrain Features: Flat dust and dirt on the road, dense foliage off the path requires a DC 12 Athletics or Acrobatics to pass through 5 feet.
Treasure: 70 gold dispersed among them.
Conclusion:
Whether the toll collectors are avoided or attacked, the path to the Thal is now clear. Upon investigation of the bodies, the players will find a symbol much like Glorik had with a labeling of "Scarlet Eye" below it. It is unclear as to what this could mean, but if citizens in the Thal are questioned about it, they will claim them to be mercenaries for hire but not a bandit group. Be sure to show the players IMAGE#1 for memories sake (The Scarlet Eye is a group hired by Magnus to stop the travelers.)
Tough Dogs
Setup:
When the players travel in a direction other than to Thal or if the law has been summoned during the previous scene, they are stopped by a group of 20 guards with a carriage. As they surround you, one of the guards reads a decree that you are to be arrested for your crimes against Orland, including counts of arson, burglary, blackmail, and vandalism. If the players explain their purpose for violence in The Salty Dog and pass a DC 8 Persuasion, the guards will forgo the charges of violence, but will insist you to join them, even explaining to the PCs that they have been sent by Orland due to him being in grave danger. If the party is able to talk their way out of the imprisonment, the guards will follow behind the PCs until they know they will go to Valea, allowing them to continue their journey.
If the party refuses, the guards will use force, sparking combat. The PCs will either escape or be captured. If captured, skip to Act I Scene I where they are being unloaded from the wagon.
Should the PCs escape this obligation by killing all the guards or escaping in some way, skip to Act I Scene III.
Experience Total
Finding Orland (250 xp)
- The Salty Dog (100 xp)
- The Road to Thal (150 xp)
Encounter experience (≈1,000 xp)
- Glorik Mastbreaker (≈100 xp)
- The Thal Toll Collectors (≈900 xp)
Previous XP amount: 100,000 xp
Prologue XP total: 1,250 xp
Total XP Progression: 101,250
Current Level: 12
Act Loot: 150 gp total + 20 gp per player
NPCs and Organizations
Orland Earcoro: Oldest member of the Thal Council, Orland holds the greater good as his ideal, no matter what it may take. He tends to overlook social rules and edicate, with Intelligence being his high score and Strength being his low score. During the Thal Council Meeting, he holds the majority of information about history, Magnus, the Time of Chaos. Regardless of how the PCs are towards them, he believes they are able to complete the mission. (Orland Stat Block)
Talwisul Windwalker: Courier for the Thal Council. Contrary to what his name suggest, Talwisul speaks slowly and delibrately, holding a neutral status on most subjects. If given the innocent opportunity, Talwisul will swipe a few coins profit, but never at the expense of someone else. His high score is Dexterity and low score is Intelligence. (Talwisul Stat Block)
Glorik Mastbreaker: Hired sailor of the Haunted Windchime, Glorik works as a trader for the Western Ethir Trading company as a grunt, but also works for the Scarlet Eye as smuggler and fence. Glorik enjoys the sea but hates the work, causing him to only enjoy his time on land if he doesn't have rules to follow. High score is Strength and low score is Wisdom and Dexterity. (Glorik Stat Block)
Scarlet Eye: At this juncture, the Scarlet Eye is a mercenary group that is usually hired by patrons to assassinate, smuggle, or blackmail. Their symbol is a red inked iris and eyelashes.
The Thal Council: Refered to as the Thal, governmental structure for Thal and the surrounding port communities.
Back to Act Listing
